How to Paint Tin Cans for Creative Home Decor Ideas?
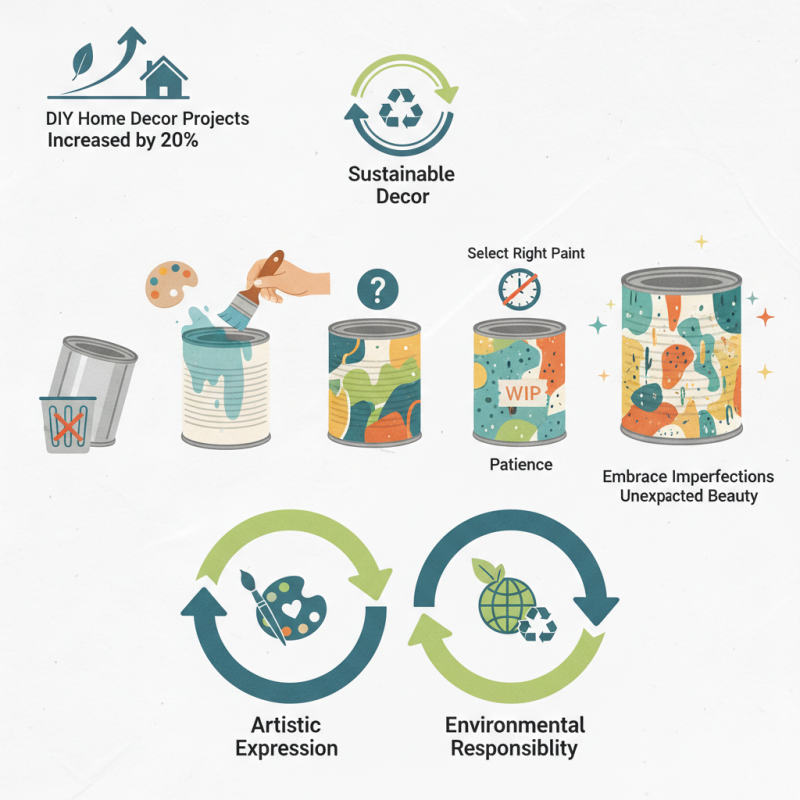
painting tin cans is an accessible way to enhance home decor. A recent survey indicated that DIY home decor projects increased by 20% in the past year. This trend reflects a growing interest in personalized and sustainable decorating options. Tin cans, often seen as waste, can be transformed into eye-catching decor pieces.
Research shows that upcycling materials like tin cans helps reduce waste. It also fosters creativity among homeowners. painting tin cans allows individuals to express their unique tastes while making eco-friendly choices. A wide range of colors and techniques can be applied, making it a versatile project.
However, achieving the perfect finish may require practice. It's crucial to select the right paint, as not all are suitable for metal surfaces. Patience is key, and mistakes can lead to unexpected designs. By embracing imperfections, the artist can discover unexpected beauty in their creations. Overall, painting tin cans offers an opportunity for both artistic expression and environmental responsibility.
Choosing the Right Tin Cans for Your Painting Project
When choosing tin cans for your painting project, consider their size and shape. Cans come in various dimensions. Smaller cans are ideal for tabletop arrangements, while larger ones can serve as floor planters. According to a report by the Decorating and Design Association, repurposing tin cans decreases waste by over 30%, making them a sustainable choice.
Surface condition matters too. Smooth surfaces allow paint to adhere better, resulting in a more finished look. Check for rust or dents. A report from the Home Improvement Research Institute states that 70% of DIY painters prefer cans with minimal imperfections. This ensures your painted design remains vibrant and intact longer.
Finally, consider the can's previous contents. It’s important they’ve held safe materials. Cans that contained food are often best. Experts suggest rinsing and drying them thoroughly to prepare for painting. Remember that while creativity is key, the right materials elevate your project. Each choice might reflect a unique style, but good preparation is crucial for the best outcome.
How to Paint Tin Cans for Creative Home Decor Ideas?
| Tin Can Type | Dimensions (inches) | Best Use | Painting Tips |
| Vegetable Can | 4 x 4.5 | Planters | Use spray paint for a smooth finish. |
| Soup Can | 3 x 4 | Candles | Prime with a rust-inhibiting spray primer. |
| Coffee Can | 5 x 6 | Storage | Use acrylic paint for vibrant colors. |
| Baking Soda Can | 3.5 x 5 | Bathroom Storage | Seal with a clear coat for durability. |
Preparing Tin Cans for Painting: Cleaning and Priming Steps
Cleaning and priming tin cans is an essential step before painting. Start by gathering your materials. You will need soap, water, and a scrub brush. Rinse the cans thoroughly to remove any residue and labels. Sometimes, stickers leave stubborn glue behind. A little rubbing alcohol can help break down this adhesive. Pay attention to corners where dirt hides.
After cleaning, it’s time to prime. Choose a good quality primer spray or brush. This step ensures that paint adheres well to the surface. Apply a light coat for an even finish. Some people skip this step, but it can lead to peeling later. Make sure to let the primer dry completely. This pause in the process is important for the best outcome.
As you prepare the tins, reflect on your choice of colors and designs. The wrong paint can clash with your decor. Test shades on small areas before committing. These decisions can significantly impact your creativity and overall aesthetic. Remember, the goal is to enhance your space, so take your time to get it right.
Creative Home Decor: Painting Tin Cans
Selecting the Best Paints and Brushes for Tin Can Decoration
When it comes to decorating tin cans, choosing the right paints and brushes is crucial. For a smooth finish, look for acrylic paints. They adhere well to metal and offer vibrant color options. Using a matte finish can add a rustic touch, while glossy paints create a sleek look. Consider applying a primer before the paint to ensure better adhesion.
The type of brushes you use also matters significantly. A mix of flat and round brushes can help you achieve various effects. Flat brushes are perfect for large areas, while round brushes work wonders for intricate details. Don’t forget to have a smaller brush for touch-ups; this can save your project if you make mistakes.
Tips: Test your paint on a small area first. This step helps you see how the color interacts with the metal. Also, consider using painter’s tape to create clean lines and designs. Remember, painting cans isn't always perfect. Embrace imperfections as unique features of your decor. Experimentation is key; in art, mistakes can lead to unexpected beauty.
Creative Painting Techniques for Unique Looks on Tin Cans
Painting tin cans is an excellent way to add a personal touch to your home decor. You can create unique looks by exploring various painting techniques. One simple method is using acrylic paint, which adheres well to metal surfaces. Ensure the can is clean and dry before applying paint. Tap into your artistic side by creating patterns or designs with painter’s tape. This adds a level of precision to your artwork, resulting in beautiful geometric shapes.
Another exciting technique is the sponge painting method. By using a sponge, you can achieve a textured look. Dip the sponge into your chosen paint and dab it onto the can. The result is a soft, layered effect. Don’t shy away from mixing colors, as it can create a more dynamic visual. Remember, no two cans will look alike, which adds charm to each piece. Embrace imperfections; they often lead to surprising beauty in each project.
For a rustic look, try a distressed paint finish. Paint the can in a solid color, then lightly sand certain areas. This reveals the metal beneath and gives the can an aged appearance. Experimenting with different approaches can lead to design flaws, but these imperfections can also enhance the overall aesthetic. Trust your instincts and let creativity flow, but be prepared for some trials and errors along the way.
Ideas for Using Painted Tin Cans in Home Decor Arrangements
Tin cans can be transformed into charming decor pieces. With a bit of paint, they can fit various home styles. Consider using pastel hues for a soft look. Bright colors can add a vibrant touch to any room. Simply spray or brush paint onto clean cans for the best results. Let the paint dry completely before using them in your arrangements.
One creative way to use painted tin cans is as planters. They can hold herbs or flowers while adding color to a kitchen or dining area. Arrange several cans on a windowsill for a lovely display. Label each can for added organization and style. Painted cans can also serve as pencil holders on a home office desk, bringing order and flair.
For the living room, group different sized painted cans together. Use them as vases or candle holders. Experiment with various shapes and designs. It’s okay if they don’t turn out perfect; each can has its unique charm. Think about contrasting colors to create visual interest. Whether rustic or modern, painted tin cans can truly enhance your home decor when creatively arranged.